


How to Use the Particle Emitter in Jujutsu Shenanigans (JJS) – Complete Skill Builder Guide
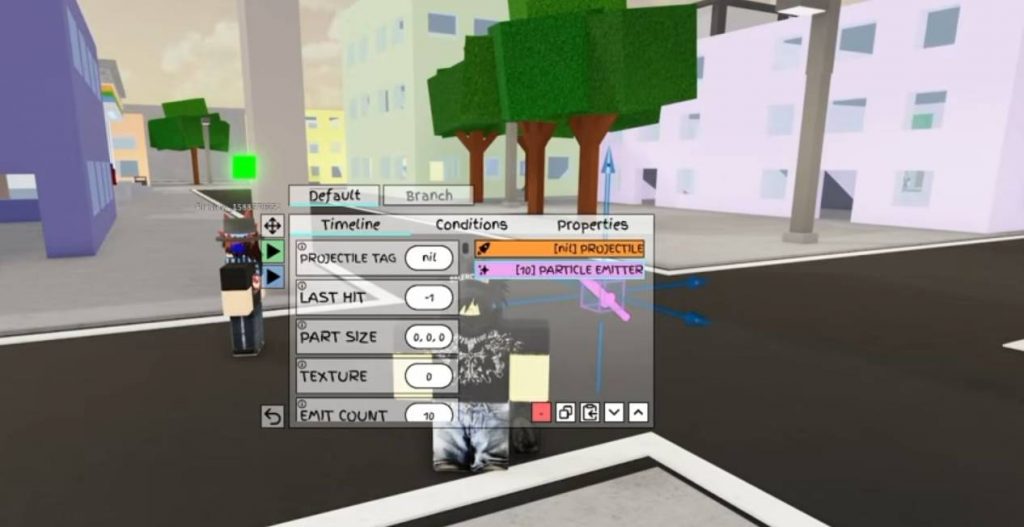
The Particle Emitter is one of the most powerful tools available in the Jujutsu Shenanigans Skill Builder, allowing creators to design custom visual effects for attacks, projectiles, and abilities. While the editor offers dozens of settings, understanding what each option does makes it much easier to create professional-looking effects. This guide explains every major Particle Emitter setting, including particle size, emission rate, colors, lifetime, acceleration, lighting, orientation, emitter shapes, and more.
What Is the Particle Emitter?
The Particle Emitter is used to generate visual effects (VFX) such as:
- Fire
- Smoke
- Sparks
- Energy auras
- Magic effects
- Dust clouds
- Explosions
Instead of using pre-made effects, the editor lets you customize nearly every aspect of how particles behave. If you’re creating a custom move or ability, mastering the Particle Emitter is essential.
Projectile Tag
The Projectile Tag links your particle effect to a projectile. When attached, the particles will follow the projectile instead of remaining at a fixed location. This is useful for creating effects like:
- Energy blasts
- Fireballs
- Arrows
- Lightning attacks
- Flying projectiles
Without a Projectile Tag, the emitter functions independently.
Last Hit
The Last Hit option behaves similarly to other Last Hit settings within the Skill Builder. It’s primarily used to determine when certain particle effects activate during an attack sequence, allowing you to synchronize visual effects with the finishing hit of a combo or skill.
Part Size
Part Size controls the overall size of every particle generated by the emitter. Increasing the value creates larger particles, while lowering it produces much smaller visual effects.
Examples include:
- Small sparks
- Medium smoke
- Large explosions
- Giant magical effects
Adjust this setting depending on how noticeable you want your VFX to appear.
Emit Count
Emit Count determines how many particles are created when the emitter activates. Think of it as the number of particles released at once. A low Emit Count creates lighter effects, while higher values generate much denser visuals.
Higher values work well for:
- Explosions
- Heavy smoke
- Fire bursts
- Impact effects
Lower values are ideal for subtle particles like floating dust or ambient magic.
Rate
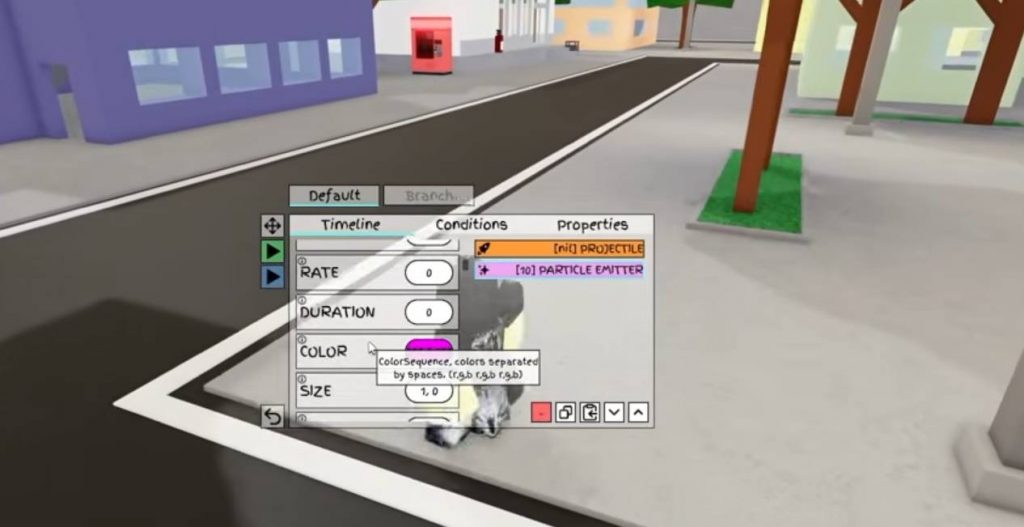
The Rate setting controls how frequently particles are emitted. Higher values mean:
- Faster particle generation
- Denser continuous effects
Lower values result in:
- Slower emission
- More spaced-out particles
If you’re creating a continuous aura or flame effect, increasing the Rate produces a much fuller appearance.
Duration
Duration determines how long the emitter remains active. Short durations are useful for:
- Attack impacts
- Quick flashes
- Small explosions
Longer durations are better suited for:
- Persistent smoke
- Magic circles
- Energy fields
- Environmental effects
Experiment with different durations depending on the style of ability you’re creating.
Color
The Color property allows you to define one or multiple color values throughout a particle’s lifetime.
Instead of using only one color, you can create smooth color transitions.
For example:
- Pink → Black
- Blue → White
- Orange → Yellow
- Purple → Transparent
Using multiple color points lets your particles gradually change as they disappear, producing much smoother visual effects.
Size and Transparency
Size and Transparency work similarly to the Color editor.
Instead of changing colors over time, these properties allow particles to change:
- Scale
- Opacity
This means you can create particles that:
- Grow larger as they move.
- Shrink before disappearing.
- Fade in smoothly.
- Fade out naturally.
Using gradual transitions makes effects appear much more polished than static particles.
Squash
The Squash setting stretches or compresses particle shapes.
Positive values stretch particles, while negative values squash them.
This property is especially useful when creating:
- Speed effects
- Motion trails
- Energy beams
- Stylized explosions
Like several other settings, Squash can also transition through multiple values over time.
Lifetime
Lifetime determines how long each individual particle exists.
Instead of using a single value, you specify:
- Minimum lifetime
- Maximum lifetime
For example:
- Minimum: 1 second
- Maximum: 3 seconds
Each particle spawned will randomly receive a lifetime somewhere within that range.
Randomized lifetimes help effects look more natural.
Speed
Speed controls how fast particles move after spawning.
Higher speeds create:
- Fast-moving sparks
- Energy blasts
- Flying debris
Lower speeds work better for:
- Floating smoke
- Mist
- Gentle magical particles
Like Lifetime, Speed can also use randomized values.
Rotation
Rotation determines the initial angle of each particle.
Changing this value affects how particles appear when they’re first generated, especially if the texture has a visible direction.
Rotation Speed
Rotation Speed controls how quickly particles spin while active.
Positive values rotate in one direction.
Negative values rotate in the opposite direction.
This setting is commonly used for:
- Magical runes
- Energy spheres
- Rotating debris
- Twisting smoke
Acceleration
Acceleration works similarly to adding velocity over time.
For example:
- Positive upward values push particles upward.
- Negative values pull particles downward.
This makes it possible to simulate:
- Gravity
- Rising smoke
- Falling embers
- Floating magical energy
Combining Speed and Acceleration produces much more dynamic particle movement.
Drag
Drag slows particles over time.
Higher Drag values gradually reduce movement until particles almost stop.
Negative Drag has the opposite effect by increasing particle speed as time passes.
This property is useful for fine-tuning movement and preventing particles from traveling unrealistically far.
Light Emission
Light Emission determines how much light each particle produces.
Increasing this value creates brighter glowing effects, making it ideal for:
- Fire
- Magic spells
- Lightning
- Energy attacks
Subtle lighting often produces more realistic results than extremely bright values.
Light Influence
Light Influence controls how much external lighting affects your particles.
If Light Emission is enabled, increasing Light Influence allows particles to react more noticeably to their own lighting and the surrounding environment.
While it can be confusing initially, experimenting with both settings together quickly demonstrates how they interact.
Z Offset
Z Offset determines which particles appear above or below others.
Particles with higher Z Offset values are rendered in front of particles with lower values.
This layering system is particularly useful when combining multiple emitters into a single visual effect.
Spread Angle
Spread Angle changes the direction particles are emitted across the:
- X-axis
- Y-axis
- Z-axis
A narrow spread creates focused beams, while wider angles generate effects like explosions or particle sprays.
Position
Position controls the emitter’s location relative to its origin.
Adjusting Position allows particles to spawn exactly where you want them, making it easier to align effects with attacks or projectiles.
Locked to Path
Locked to Path determines whether emitted particles continue moving with the object that spawned them.
When enabled:
- Both the emitter and particles follow the object.
When disabled:
- Only the emitter moves.
- Existing particles remain where they were created.
This setting is useful for distinguishing between moving trails and stationary effects.
Orientation Types
The Particle Emitter includes four orientation modes.
Facing Camera
Particles always rotate toward the player’s camera, ensuring they’re visible from every viewing angle.
Facing Camera World Up
Similar to Facing Camera, but vertical rotation is restricted, preventing particles from tilting unnaturally.
Velocity Parallel
Particles align themselves with the direction they’re traveling.
For example, upward-moving particles point upward automatically.
Velocity Perpendicular
This mode also follows movement direction but rotates particles perpendicular to their travel path.
It creates noticeably different visual styles depending on the particle texture.
Flipbook Modes
Flipbooks animate particle textures using multiple frames.
Available modes include:
- Loop
- One Shot
- Ping Pong
- Random
Loop
Continuously cycles through every animation frame before repeating.
One Shot
Plays the animation once before stopping.
Ping Pong
Animates forward before reversing back to the first frame.
Random
Randomly switches between animation frames while fading between them.
Emitter Shape
Emitter Shape determines the area where particles spawn.
Common options include:
- Box
- Cylinder
- Disk
Each shape changes the overall distribution of emitted particles.
For example, a Box produces square emission areas, while a Cylinder creates circular or cylindrical distributions.
Shape Partial
Shape Partial modifies certain emitter shapes.
For cylindrical emitters, it controls the top radius.
Examples include:
- 0 creates a cone.
- 1 creates a full cylinder.
This allows for additional customization when designing unique particle patterns.
Run on Server
Run on Server determines who can see the particle effect.
If enabled:
- Every player can see the effect.
If disabled:
- The effect becomes client-side.
- Only the player who created it can view it.
Server-side particles are recommended for multiplayer abilities, while client-side effects are useful for testing or personal visuals.
The Particle Emitter in Jujutsu Shenanigans offers an impressive level of customization, making it possible to create everything from simple sparks to complex spell effects. While the number of settings may seem intimidating at first, each property controls a specific aspect of how particles look, move, and behave.
By experimenting with properties like Emit Count, Rate, Lifetime, Rotation, Acceleration, and Emitter Shape, you’ll quickly gain a better understanding of how each setting contributes to the final visual effect. With enough practice, you can build custom VFX that make your skills look far more dynamic and professional.
Jujutsu Shenanigans