


Chip Cards Clash of Critters Tier List, Best One to Use!
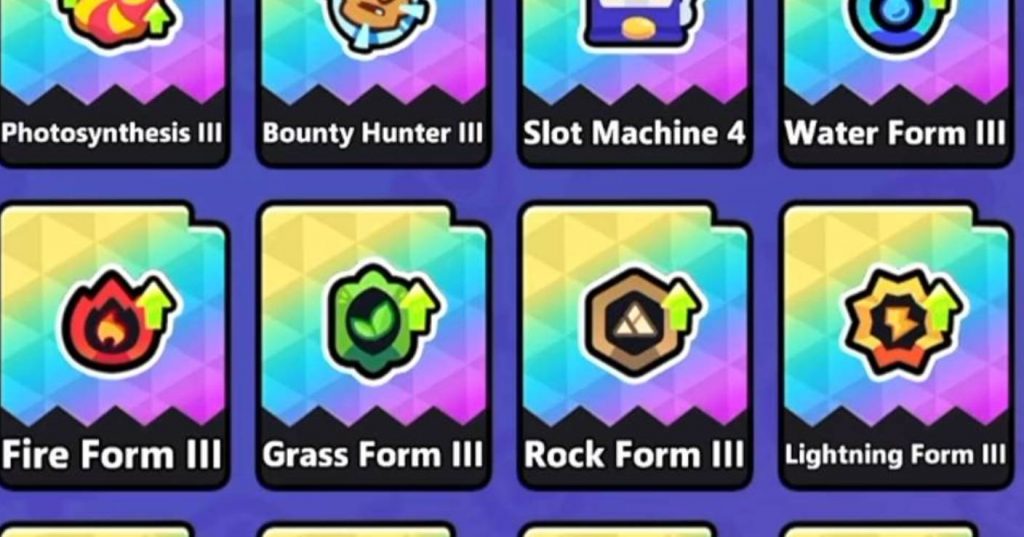
Choosing the right Chip Card can make a big difference in Clash of Critters, especially when playing Horde Invasion. Some cards can give your Tatari a useful stat boost, while others can completely change how you manage your formation and resources.
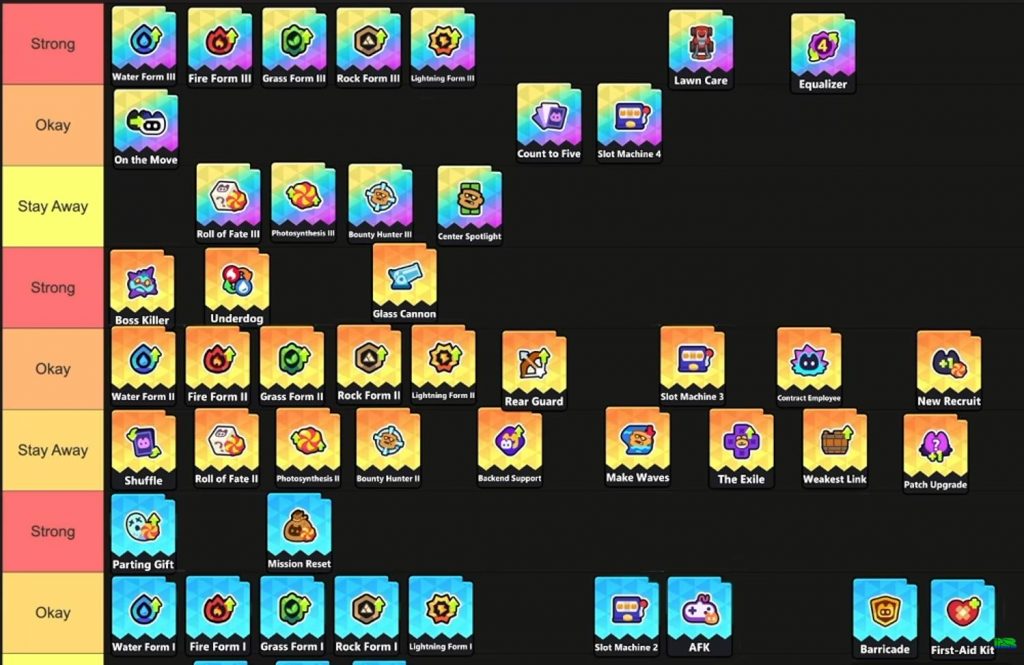
This tier list ranks the Chip Cards into three groups: Strong, Okay, and Stay Away. The ranking is based on how useful each card can be during a run, how much value it provides, and whether there are situations where its effect can hurt your overall build. Keep in mind that some cards are highly situational. A card that looks average in one run can become very useful when your formation is built around it.
Chip Cards Clash of Critters Tier List
Rainbow Chip Cards
The Rainbow Chip Cards include some of the more interesting effects in the game. Several of them can provide strong upgrades, but their value depends heavily on when you receive them.
Strong Rainbow Chips
All Elements
The elemental Chip Cards provide around a 30% to 40% boost depending on the card and element involved. These are not necessarily the strongest cards in the entire game, but they are reliable when you already know which Tatari you want to focus on.
For example, if your main damage dealer is a Lightning Tatari, taking the Lightning option can make sense. Rock can also be a good choice when you are using a Beetle as your main DPS, while Grass can be useful when you need more damage against certain enemies such as the worm.
The important thing is to match the elemental boost with the units you are already using. Do not simply choose an element because its percentage looks good.
Lawnmower
Lawnmower can be surprisingly powerful, especially if you manage to obtain two copies.
The card creates six single-use lawnmowers at the bottom of the map. They activate automatically when enemies reach them. Each mower can kill five non-boss Zobos and deal damage equal to 50% of a boss’s maximum HP.
This makes the card particularly useful during the final part of a wave. You can allow enemies to move toward the bottom and let the lawnmowers activate automatically.
Getting two Lawnmowers can make the effect even stronger. However, you need to understand how the five non-boss kills work because smaller enemies can trigger the effect before the boss reaches the mower.
Equalizer
Equalizer is another strong but situational card.
Its effect resets your deployed towers to level 4. This becomes extremely useful if you have several low-level towers already deployed.
One popular strategy is to prepare as many Tatari as possible before Wave 5 while keeping them at level 1 or level 2. If Equalizer appears at the right time, those units can receive a major level boost at once.
The timing is important. If you get Equalizer early, you can prepare your formation around it. Getting it much later makes the strategy harder to use effectively.
Okay Rainbow Chips
On the Move
On the Move gives a tower 20% more attack and attack speed for 20 seconds after it is moved.
This is mainly useful for players who frequently reposition their main damage dealer. If you are constantly moving a DPS unit around to deal with wave bosses, the temporary boost can provide a nice increase in damage.
It is not necessarily a game-changing effect, but it can be worth picking when the alternatives are weaker.
Three-Tower Upgrade
This card upgrades three level 4 towers to level 5 once you have three level 4 towers deployed together.
It is most useful during the early game. You can potentially build several level 4 towers and then use the card to push them into level 5 without spending as many resources individually.
It is not an extremely powerful effect, but getting three additional level upgrades can help your early progression.
Slot Machine 4
Slot Machine 4 randomly selects four Tatari from your formation and upgrades them.
The best way to use this card is after you already have all 10 Tatari slots filled. Otherwise, you may end up receiving random units that do not fit your intended formation.
With 10 Tatari already deployed, the card becomes more predictable in terms of value because the random selections are being made from your completed formation.
Stay Away Rainbow Chips
Roll of Fate
Roll of Fate gives you a random Chip Card from the same tier along with additional Energizers.
The problem is that you are giving up control over which Chip Card you receive. You could get something useful, but you could also receive a card that does not work with your current build.
The extra resources usually are not enough to make the gamble worthwhile.
Photosynthesis
Photosynthesis is not necessarily a terrible card. The main problem is what can happen when you push it toward level 8.
A level 8 upgrade can interfere with the rest of your progression. You may end up with several units sitting at level 8 while another important unit or upgrade is still much lower.
This can make it harder to manage your Candy and keep your formation balanced.
Bounty Hunter
Bounty Hunter has a similar problem to Photosynthesis. The card itself can be useful, but pushing it to level 8 can create problems with your upgrade choices.
If you already have several strong level 8 upgrades, adding another one can leave you without enough resources to properly upgrade the rest of your formation.
Center Spotlight
Center Spotlight is considered one of the less desirable choices because it can make the enemy waves much harder to control.
The effect causes bosses to appear across three lanes. While this might sound useful because you can potentially attack several bosses at once, it also creates additional pressure.
You still have regular Zobos coming through the side lanes, so you cannot simply focus your entire formation on the center.
In many runs, this can result in your team becoming overwhelmed during the later stages.
Legendary Chip Cards
Legendary Chips include some of the strongest individual effects available, but there are also several cards that are highly dependent on your formation.
Strong Legendary Chips
Boss Killer
Boss Killer is one of the easiest Legendary Chips to recommend.
It provides an additional 25% damage against bosses, which is extremely useful because bosses are often the main obstacle during difficult runs.
If you are struggling to finish later waves because bosses have too much HP, Boss Killer can directly address that problem.
Underdog
Underdog changes the normal elemental counter system.
When your element would normally be countered by the enemy, the effect instead treats your element as countering the enemy.
This can be particularly useful against difficult enemies where you would otherwise have an elemental disadvantage.
The exact interaction can depend on how the game handles the counter system, but removing or reversing an elemental disadvantage can already provide significant value.
Glass Cannon
Glass Cannon gives all of your Tatari 25% more attack but reduces their maximum HP by 10%.
That is a strong offensive boost, but it comes with an obvious downside.
This card is better for players who are already capable of surviving deep into a run. If you are dying around Wave 400 or 500 in Difficulty 3, losing 10% Max HP may make the problem worse.
However, if your team can reach the later waves, such as Wave 34 or Wave 35, the additional attack can become extremely valuable.
Okay Legendary Chips
All Elements
The Legendary elemental cards provide around a 30% boost.
They are useful when they match your main DPS or the element you specifically need. However, they are ranked below Boss Killer, Underdog, and Glass Cannon because those cards can provide more specialized benefits.
Still, an elemental boost is rarely a completely bad choice.
Rear Guard
Rear Guard gives Tatari in your two back rows 30% attack speed.
The additional attack speed can help your backline deal damage more quickly, but it does not feel as impactful as the strongest Legendary effects.
It is a solid supporting effect rather than something you should build your entire run around.
Slot Machine 3
Slot Machine 3 works similarly to Slot Machine 4, except it randomly upgrades three Tatari instead of four.
Again, you ideally want all 10 Tatari already deployed before using it. That gives the random upgrades a better chance of benefiting your established formation.
Three free level increases can still be useful, particularly when you are trying to save resources.
Contract Employee
Contract Employee gives you one additional Tatari, but the extra unit stays at level 3.
It cannot be revived or upgraded, which limits its long-term value.
Having an 11th Tatari can still be useful in some formations, but because the unit is random and permanently stuck at level 3, its effectiveness depends heavily on what you receive.
New Recruit
New Recruit can help when your formation is missing something important.
For example, if you failed to get the damage dealer you wanted, New Recruit can give you another option and help fill an empty role.
The downside is that adding another unit can spread your upgrades too thin. Instead of having one powerful damage dealer at level 7, you might end up with two weaker damage dealers around level 5.
That is why New Recruit is more of a backup option than a top-tier choice.
Stay Away Legendary Chips
Shuffle
Shuffle replaces your Tatari with random ones while giving you additional Energizers.
This can completely destroy a carefully prepared formation.
If you have already spent a lot of time building your team around specific Tatari and skills, replacing everything with random units is usually not worth the risk.
Roll of Fate
Roll of Fate has the same basic problem here. It gives you a random Chip Card from the same tier plus additional Energizers.
There is always a chance you get something good, but you lose control over your build in exchange for that gamble.
Back Support
Back Support gives a 30% damage boost to Tatari that have only one Tatari positioned in front of them.
The problem is that this formation requirement is quite specific. Most players will not naturally have a setup where only one Tatari is positioned in front of the boosted unit.
Because of that, it is difficult to get consistent value from the card.
Make Waves
Make Waves creates a river that reduces Zobo movement speed by 40% while they are inside it.
While slowing enemies sounds useful, the river only affects a specific line and does not provide enough impact compared with stronger defensive or offensive effects.
It can occasionally help, but it is not a card that should be a priority.
The Exile
The Exile gives a Tatari without adjacent allies 20% more attack, Max HP, and defense.
The issue is that you need to isolate a Tatari from the rest of your formation to receive the bonus.
That makes it difficult to use effectively without weakening your overall formation.
Weakest Link
Weakest Link gives the Tatari from the element with the fewest deployed units a 10% boost to attack, defense, and attack speed.
The bonuses are decent, but the overall increase is not large enough to make this a priority.
You would usually get more value from a card that directly improves your main damage dealers or provides a stronger team-wide effect.
Patch Upgrade
Patch Upgrade replaces deployed Tatari below level 3 with random Tatari from your formation and increases the replacement’s level by one.
This can occasionally save a poorly chosen unit. For example, if most of your formation is already level 5, 6, or 7 while one unwanted Tatari is stuck at level 1, you could take a chance on getting a better replacement.
The problem is that the result is random, so there is no guarantee you will receive the unit you actually need.
Rare Chip Cards
Rare Chips may not have the same rarity as Legendary Chips, but some of them can be extremely useful when used correctly.
Strong Rare Chips
Parting Gift
Parting Gift is arguably one of the best Rare Chips in the game.
When one of your Tatari dies, you receive 200 Coins back. You can then use those resources to bring the unit back for a lower cost.
This becomes especially powerful during the later stages when your units are dying frequently.
You can repeatedly deploy units, allow them to be defeated, collect the returned resources, and bring them back again.
The biggest issue is managing high-level upgrades. If you have several level 8 units, you may run into situations where you do not have enough Candy to handle the upgrade options that appear after a unit dies.
This is one of the main reasons to be careful with cards like Photosynthesis and Bounty Hunter.
Mission Reset
Mission Reset recalls all deployed Tatari and gives you 200 Energizers for each one.
If you manage to deploy all 10 Tatari before activating it, that can mean 2,000 additional Energizers.
The strategy is simple: get as many units onto the board as possible, keep them relatively cheap, and then take advantage of Mission Reset when it appears.
There is some risk because you can become weaker during the first few waves while preparing for the card. If you do not get Mission Reset, you may have spent time building around a strategy that never pays off.
Okay Rare Chips
All Elements
The Rare elemental options are useful when they match your main damage dealer.
They are not necessarily powerful enough to compete with Parting Gift or Mission Reset, but a straightforward elemental boost can still improve your run.
Choose the element that fits your current formation rather than picking randomly.
Slot Machine 2
Slot Machine 2 randomly brings in two Tatari from your formation.
To get the best value, fill all 10 Tatari slots first. The two random units can then receive level upgrades without forcing unwanted units into an incomplete formation.
It is a decent resource-saving option, although the effect is smaller than the higher versions of Slot Machine.
AFK
AFK can provide additional resources, but it comes with several drawbacks.
You need to make sure your Tatari formation is already set up because the effect can randomly select units from the queue.
The time required to benefit from the effect can also make it feel less useful compared with cards that provide an immediate advantage.
Barricade
Barricade gives Tatari in your two front rows 40% Max HP and defense, but reduces their damage by 10%.
This can be useful if you are struggling to survive the early and middle parts of a run.
However, losing damage is a significant downside. If your team already survives comfortably, the defensive boost may not be worth the damage reduction.
First Aid Kit
First Aid Kit allows Tatari in the two front rows to recover 15% of lost HP every four seconds.
This provides useful sustain and can help your frontline survive longer.
It is still less appealing than direct damage increases for players who are already reaching the later waves, but it can be a good choice if survival is your main problem.
Overall Best Chip Cards
If you want a simple shortlist of the cards worth prioritizing, these are some of the strongest choices from the tier list:
- Parting Gift — Excellent resource generation and one of the strongest Rare options.
- Boss Killer — Great against the bosses that usually stop late-game runs.
- Glass Cannon — Excellent damage boost for teams that can survive the HP reduction.
- Underdog — Strong option for manipulating elemental matchups.
- Mission Reset — Huge resource potential when you have 10 Tatari deployed.
- Lawnmower — Particularly strong when you can obtain two copies.
- Equalizer — Very useful when you prepare several low-level units before Wave 5.
- Elemental Chips — Reliable when they match your primary DPS or required element.
There is no single Chip Card that will be perfect for every Clash of Critters run. Your formation, current wave, Tatari levels, and the other cards available to you can all change the value of a particular choice.
Parting Gift, Boss Killer, Underdog, Glass Cannon, Mission Reset, Lawnmower, and Equalizer are some of the cards that can provide the biggest advantages when used correctly.
At the same time, cards such as Shuffle and Roll of Fate can be dangerous because they introduce too much randomness. Other cards, including Photosynthesis, Bounty Hunter, and Center Spotlight, can create problems depending on your formation and how far you are into the run.
The best approach is to think about your current build before selecting a Chip Card. A supposedly weaker card that perfectly fits your formation can often be more useful than a powerful card that forces you to change your entire strategy.
Clash of Critters